Tuesday, November 12, 2013

DIY: Fussy Cut Quilted Christmas Stockings

Last year, I had a Christmas fail! No stocking for the baby : ( Well, I substituted an old stocking we had...but it did not match the other family stockings on the mantle. This year, I am determined to have all four family stockings coordinating, and lovingly quilted by "mom." Awww.


I found a classic and elegant Christmas print. It is the "Holiday Frost" collection by Jan Shade Beach for the Henry Glass Fabric company. I just love the graceful scrolls and snowflakes mixed in with graceful reindeer! The true Christmas red and green were a must for me...I just can't do aquas and purples at Christmas...it just doesn't seem right to me! Anyhoo~ I mixed in some red and green polka dots from my stash to emphasize that traditional feeling.


 I wanted to create quilted stockings for everyone. That way each would be unique! I chose the various blocks I would use for the designs. I knew I wanted to alternate the traditional quilt blocks with a beautiful piece of the main fabric. The images were so beautiful, I just had to showcase them!
 
Today I am going to share with you how I completed these "fussy cuts" in order to showcase the main prints. After measuring around the design I wanted to cut out, I decided that a 5" square would work best. After getting crossed eyes from my grid ruler, I wanted to be sure there were no mistakes! I have just enough of the prints to make 4 stockings.
 
I decided to create a viewfinder. I use them in the art classroom to help students focus on an item they are drawing...but it works great here too!
 
 
You need:
  • An old picture mat, cardstock, or just a cereal box!
  • Tape
  • Scissors
  • Chalk or a Fabric Marker
  • Ruler
  • Pen
  • Fabric that you want to fussy cut ( On this particular fabric, I needed 1/2 yard to get the 10 fussy cut suares I needed)
 
 
When you are done...you will have an accurate sturdy viewfinder that allows you to more easily center your fussy cut.
 
 
 First thing you need to do is cut the opposite corners of your mat on a diagonal as shown above.
Note: If you are using cardstock or a cereal box, you need to cut it into a 2" thick frame shape with no center first.
 
 
 You will now have two "L" shaped pieces.
 
 
Slide the pieces closer together and overlap them.
 
 
I slid and adjusted the pieces over my cutting mat so I was certain to get a perfectly straight 5" center square opening.
If you do not have a cutting mat. you can use 2 rulers!
 
 
Next, tape the sides together so it will not shift.
Do not let the tape hang over the edges or it will stick to the fabric and obstruct your tracing.
 
 
Next, I marked a few points along the outer edge so I could more easily see the centered object.
 
 
I measured and marked 1" and 2.5" points on all edges.
 
 
Next, I ironed my fabric. It is easier to work with when its wrinkle free!
 
 
I then used my viewfinder to center the design I wanted to cut out.
 
 
Mark all edges with chalk.
Do not worry about the corners...just mark all four sides neatly.


Although it is a bit hard to see here, I have a faint yellow chalk line surrounding the tree I want to fussy cut.
 
 
Then, I moved over to the next design I needed to fussy cut.
BE CERTAIN you do not cut into your previously marked square!
The purple arrow shows you the yellow chalk line from the previously traced square...
make sure this is NOT in the new square you are cutting!
 
 
Being sure that the other chalk line was UNDER my viewfinder, I centered and marked the next square I wanted to cut.
 
 
I repeated this until I marked the width of the fabric with 5" centered squares.
In the photo above, I marked my faint chalk lines with yellow boxes for you to see better.
Sometimes the print is more off centered...but this piece had pretty straight designs.
That was helpful in cutting!
 
 
Using a scissors, or a rotary cutter and straightedge, begin to carefully cut out your 5" pre-marked squares.
 
 
You can cut out one square at a time.
 
 
If your fabric print is in a straight line, you are lucky...and you can cut the top and bottom edges all at once.
 
 
Then cut off the sides and you have your perfectly centered 5" fussy cut blocks!
 
 
Gah! That sure did eat up more yardage than I like...but the results are just so stunning!
 
 
Here is a quick tip for those of you that use rotary cutters...
Sometimes my blade is dull in just one tiny spot and it
does not cut 1 or 2 threads ...ANNOYING!
So, instead of re-cutting and dulling the blade further, or pulling out the scissors
...try this: Your seam ripper!
Yup. It is quick, handy and does not pull or distort the fabric.
 
 
Finally, I arranged my 5" fussy cut blocks with my neatly trimmed 5" quilted blocks!
 
 
Oooh!
 
 
These are starting to look like stockings!
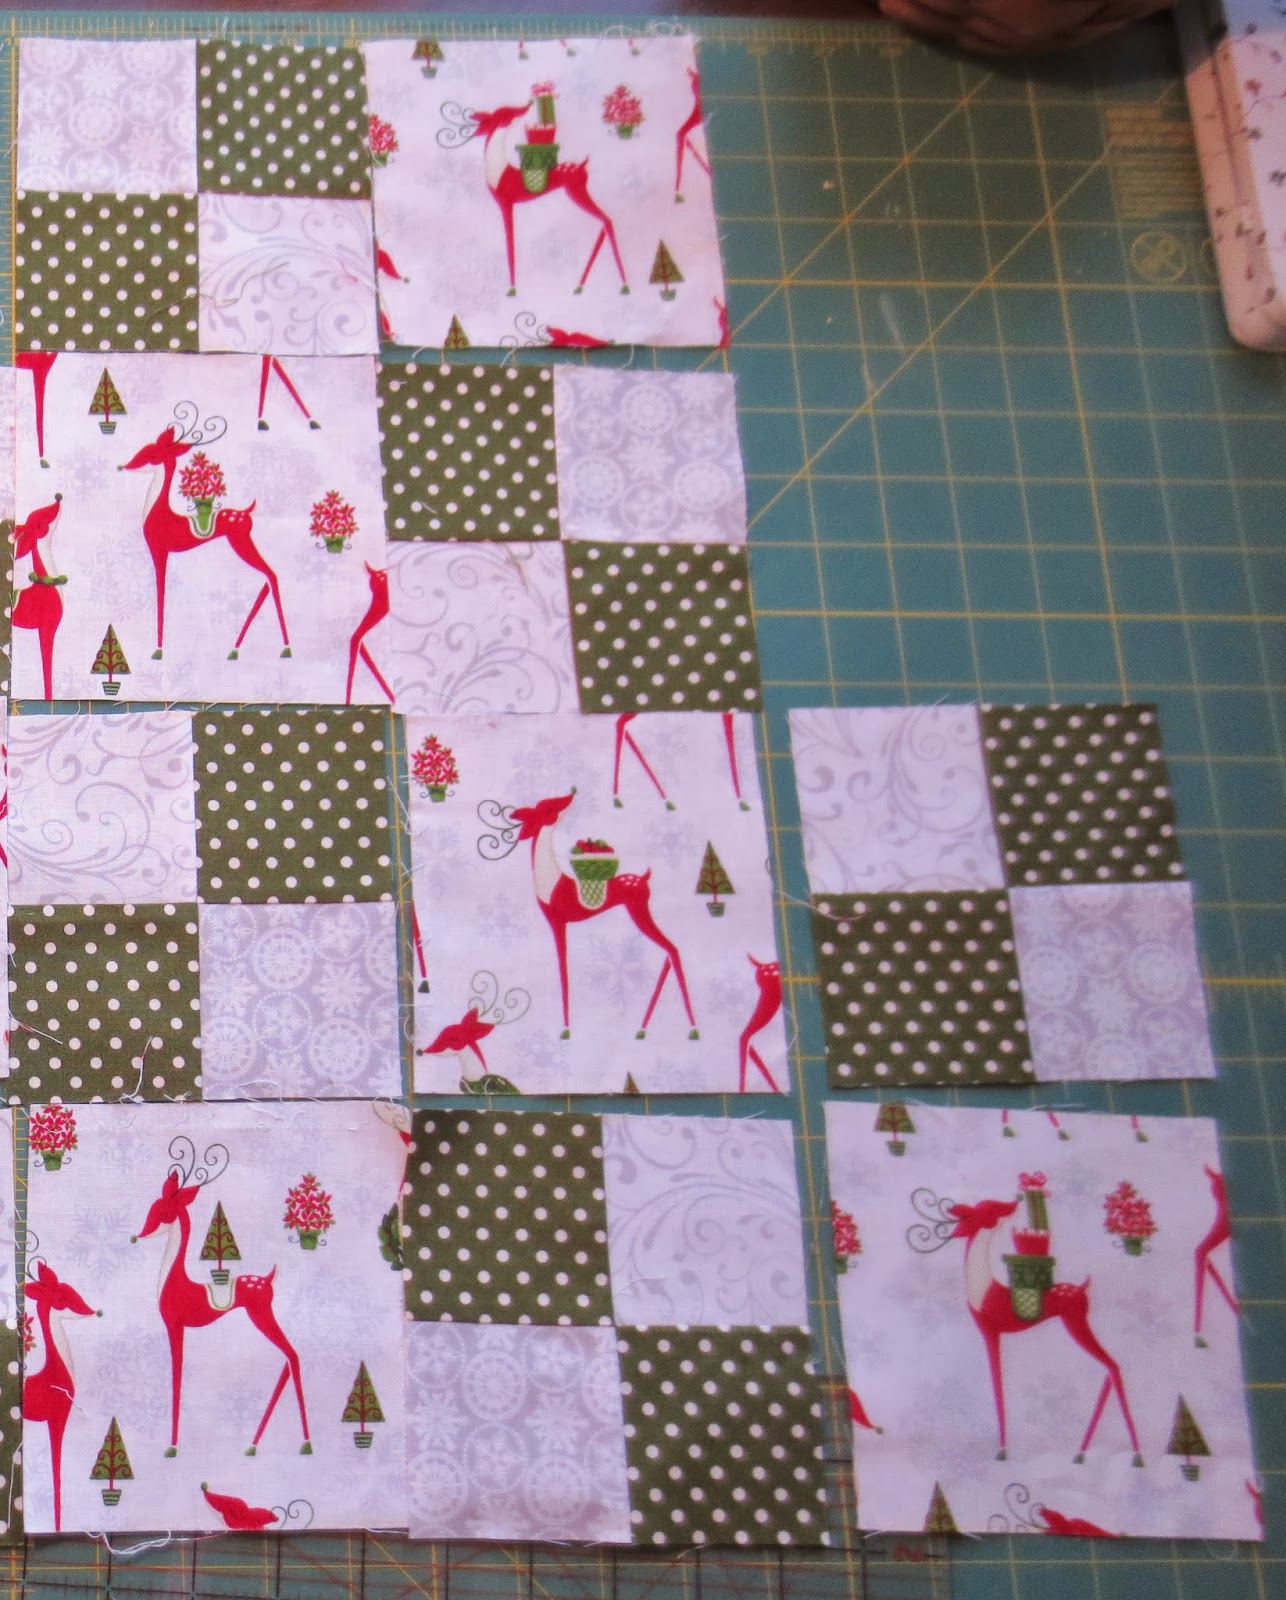
 
 
Then, I just finished piecing the blocks...
 
 
And I have my finished stocking "top"
...quilting and hand embroidering the names on is next!
 
Thanks for stopping by and
Have a beautiful day!

Thursday, November 7, 2013

DIY: Beautiful Fall Artwork

 
Aaah! Fall is in the air! The crisp breezes pick up, the foliage turns spectacular hues and you find yourself tucking your hands into your cozy fleece as you head home for hot apple cider. On your way home, do not forget to pick up a few of the prettiest of falls gifts. Those beautiful leaves!
Today, I will be walking you through the EASIEST addition to your Thanksgiving décor, this gorgeous pressed leaf Welcome artwork!
 
 
Here in Kodiak, Alaska, the beautiful Japanese maples are not around...and things turn from green to shades of brown quite suddenly! The bison on the coastline is AMAZING ...but I just miss that drive west on 64! I first made these lovely framed Welcome pieces several years ago as Christmas gifts! They were well received and cherished even though the frames were from the dollar store? Ssssh! Don't tell : )


With just a few different types and colors of leaves and grasses you can transform the free printable "Welcome" PDF at the end of this tutorial. Lets grab a few things and get started!
 
You will need....
 
  • One FREE "Welcome" Print out from the end of this post (LOTS of great colors to choose from)
  • Several leaves of varying sizes and colors....grab a few grasses too! ( I pick up twice as many as I think I may need....just in case!
  • Phone book (or if you do not have one still, just use some paper towel and a few heavy books/boxes)
  • Double faced tape or household glue
  • An old 8" x  10" frame...or one from the dollar store! I Like the kind with an easel back, then you can prop it on a counter! 
  • Optional...tweezers and a scissors.
 
 
When choosing your leaves, try to get ones that are not spotted or torn.
Choose the leaves that are still pliable, NOT DRY! Even a bit wet is ok!
 
 
Grab your good ole phone book...

 
and tuck your leaves and grasses in between the pages near the back.
Make sure that your items are all in a single layer.
Close the book and leave your items to dry for 24-48 hours.
 
*NOTE: If you do not have a phone book, use a few pieces of tissue or paper towel.
Make a sandwich...heavy book or box on top, tissue, leaves, tissue, flat surface.)
 
 
Now head over to your printer and select one of the free, fabulous "Welcome" pdf printables from the links at the end of this post. You do not have to mess around with fonts, colors or sizing! It has been taken care of for you already. The colors are shown above and listed individually as: Berry, Gourd, Maize, Moss, Acorn, & (not pictured) Black.


When you go to print, CHOOSE THE LANDSCAPE option from your print menu and voila!
 
 
Take a few minutes to carefully arrange your brittle leaves and grasses. When you remove them from your phone book and begin to work with them, the best thing to do is to slide them off the paper. Handle them as LITTLE as possible. Try to slide the pieces around, not grabbing them by the brittle edges or they may break. I used the tweezers to scoot them around my Moss "Welcome" sign so I could cut down on breakage and handling.


Do not worry if a few pieces do crumble away, it adds character! Feel free to re-arrange and even add leaves to a stem...it IS ART and you can INVENT things : ) I won't tell.
I had an ornery piece of grass, so I trimmed the end into a point to get the look I wanted! Who knew!
Finally, when you are satisfied with your arrangement, use a small piece of double faced tape, or even a dot of household glue to attach your items onto the "Welcome" printable.


~Voila!~
Get creative with your ONE OF A KIND ARTWORKS!
Carefully tuck your finished piece into that fab frame and you are FINISHED!
Set this near the front door, on your kitchen counter or as part of your fall centerpiece!
I think these would make GREAT hostess gifts too....who really needs ANOTHER pumpkin pie?! Not me!


I can just see the leaves swirling in a circle and being carried on the breeze
when I look at these...can't you?!

 
Berry
Gourd
Maize
Moss
Acorn
Black (Not Pictured)


Thanks so much for stopping by! Have a beautiful day!

Monday, October 28, 2013

DIY: Last Minute Halloween Trick or Treat Bucket Refashion

 
So, you are FINALLY finished with that fab costume and then...
you realize you need to update that treat bucket!
 
 
This is such a quick and easy bucket redo to set off your little sweeties costume.
Just be sure to do this the night before...so the Mod Podge can dry!
 
Grab a few things and lets get started!
 
You will need ...
Scrap Fabric to cover your pail
(or Paper...just fold instead of ironing)
Scissors
Pencil/Chalk
Mod Podge
Sponge Brush
Exacto knife
Hot Glue Gun & Glue Sticks
Iron & Ironing Board
Optional: Bias Tape Maker
 
 
Using the chalk, trace around the bottom of the bucket.
 
 
Cut the fabric out about 1/2" larger than the chalk circle you traced.
 Set fabric circle aside.
 
 
Measure the height of the bucket and add 1/2".
 
 
Measure the girth of the bucket and add 2".
 
 
On the long side, fold over one edge of the fabric 1/2" and press.
 
 
On one short end, fold over one edge of the fabric 1/2" and press.
Set the fabric aside for later.
 
 
Cut out a strip of fabric the girth of your bucket plus 2".
The strip should be 2" wide.
Using your bias tape maker, press the fabric.
If you do not have a Bias Tape Maker, simply fold over both edges 1/2" and press.


Fold the Bias Strip in 1/2 lengthwise and press a crease down the center.
Set the Bias Tape aside for later.
 
 
Using the Mod Podge and a sponge brush, apply the glue to the bottom of the bucket and down the sides about 1".
Do not worry about glue residue....Mod Podge dries clear!
 
 
Center your fabric circle, right side out, to the bottom of the bucket.
Apply more glue over the top of the fabric, smoothing out any fabric wrinkles as best you can.
 
 
Apply more glue to the outside of the fabric on the bottom of the bucket.
Let dry for an hour...rinse out your brush for later use!
 
 
Apply glue to the main outer surface of the bucket.
Line up your fabric neatly, starting with the short end that is NOT folded and pressed.
 
 
Glue all the fabric on the bucket, ending with the pressed edge.
Be sure to line it up neatly and smooth out the wrinkles as best you can while the glue is still wet.
 
 
Cover the top of the fabric with more glue, smoothing out wrinkles as you go.
 
 
Be sure to glue ALL edges well.
Let dry for an hour...rinse out your brush for later use!
 
 
Heat up your glue gun.
 
 
Start to glue one edge of the bias tape you made to the top edge of your bucket.
Use a clothes pin or clip to anchor the end.
 
 
Run a line of glue along the edge of your bucket a few inches at a time.
Cover the glue with your fabric strip evenly.
 
 
When you come to the handle roves, use your exacto knife to trim away the fabric from the handle slot.
 
 
Check for fit.
Continue to apply the bias tape around the entire outside edge.


Fold the bias tape over the top edge of the bucket.
Repeat the above hot glue instructions to attach the bias tape to the inside edge of the bucket.


FINISHED!
Add a cute row of lace or pompon fringe if desired!
Have a happy Halloween!