
Eeek! Easter is creeping closer, and I am SO excited that this pair of lovely dresses are finished!
A couple of cute cousins will be parading around in these shortly.

Ahhh...the Brownie Goose Millie dress!
LOVE
The gently curved armholes, the scoop neckline and the dainty shoulder straps...

Of course, the BEST features are that lovely scooped out open back and the lace overskirt.

Of course, I HAD to go and change it : )
Want to see how I altered the cut out into a cross shape?
Check out my post here...

Now, I love the Millie, but I noticed that when wrestling dressing my toddler, I had a tough time getting the dress on her.
See the above photo? The classic Millie on the right has two button loops for closing the back up.
It works, but it is a bit of a struggle in this house.
So, I decided to change the construction a bit in order to add snaps to the back for ease in dressing and perhaps longer wear.
You can see in the above photo of the Cross shape Millie cut out back on the right, that the dress can be completely opened along the back with the addition of snaps along the skirt.
How? You ask? Well, let's get to it!

Now, because I am certain that you all LOVE a button, I have left the ribbon loop and button closure just the same as the Brownie Goose Millie pdf.
Don't have that pattern yet?
You can instantly download that pattern here
Other than the materials listed in the pdf, you just need a few sets of snaps.
I used size 16 KAM snaps, but you can use any brand...even the good ole hand stitched kind.

Now, we are simply going to skip the last paragraph in the pdf on page 9.
Then repeat the first paragraph of instructions on page 9 with the opposite bodice piece.
Your bodice will now look like the one photographed above.

Attach and iron down the seam allowance of the waistband as directed on page 10...

When you finish your seams as directed on page 10, be certain to finish the entire length of the waistband piece, not just the portion that is connected to the bodice, as shown above.

See how the serged finished edge extends beyond the bodice piece, to the end of the waistband piece?
Good. Do that on both ends.
Then, when pressing, be sure to press all the way down the edge of the waistband as well.

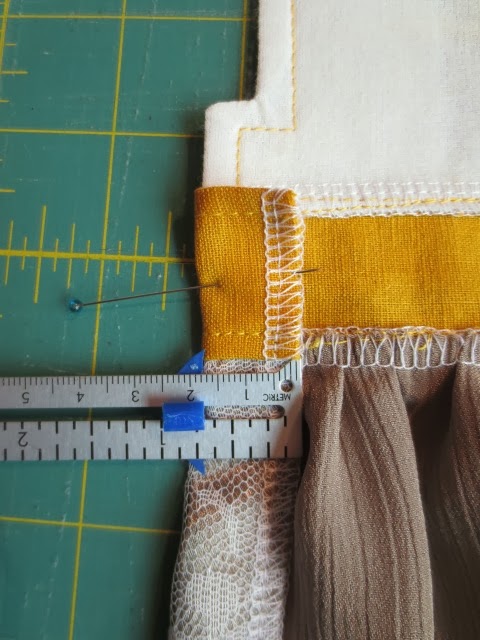
Now, gather and attach the lace overlay skirt as directed on page 11...

when doing so...be certain to have the overhang on each end be 1.25" beyond the bodice, as shown above with the navy arrows.

Here is a close up.

I also found it helpful to pin the lace to the bodice to ensure the fabric would lay straight when worn.

Follow the pdf directions to gather and attach the under skirt skirt as directed on page 12...
just place that piece right on top of your lace as shown above.

Finish those seams as prescribed and press that seam allowance up.
Topstitch your little heart out.

Now, for finishing the seams for the snap back!
Pin the lace overskirt to the underskirt along one edge.
Be sure that the 2 fabrics are not bunched up when sewn together.
This results in the 2 pieces hanging nice and straight.

On the side that you will sew the bodice buttons onto, measure out 1" from the bodice and finish the edge of the skirts, joining the lace overlay and underskirt together at the same time.

On the side that you have sewn the ribbon loops onto, measure out 1.5" from the bodice and finish the edge of the skirts, joining the lace overlay and underskirt together at the same time.

When you are finished serging those edges your open dress back will look similar to this.

Use a wide eye needle to bury your serger tails, and trim the excess thread.

On the side that you will sew the bodice buttons onto, fold over the finished edge of the skirts so that the skirt edge is flush with the edge of the bodice.
Pin the edge.

Press.

In a coordinating color thread, topstitch the folded over edge down.

You can use a different color for the waistband piece as well, if desired.

Next, line up your open back so that the cut out is nice and straight.

Find where the dress skirt pieces overlap...

Fold back the excess fabric ~0.75" on the side that you have sewn the ribbon loops onto.

Fold over the entire finished edge of the skirts so that the skirt edge extends 1" BEYOND the edge of the bodice, as shown above.
Pin and press that edge.

Topstitch ONLY the skirt pieces along the edge with coordinating thread.

You must be certain that one edge of the skirts are flush with the bodice, and one edge EXTENDS BEYOND the bodice by ~1".

See how the navy arrow on the left points to the flush edge?...and the arrow on the right points to the edge that sticks out 1"? Good. Do that.

Now, BEFORE you topstitch the waistband on the piece that has the 1" overhang, add your snap.
I also added a scrap piece of coordinating fabric instead of interfacing to reinforce the fabric that the snap is attached to.

When you are finished attaching your snap, hand stitch that small piece of waistband.

I very carefully stitched over the existing topstitching to secure it.

Now, your snap is hidden under the waistband piece form the outside of the dress.
This step seems tedious, but I feel that it helps to preserve the simplicity of the original design, and features the lovely button and ribbon loop directly above it.

Now, all that is left for this modification is to attach the rest of the snaps!

I went ahead and eyeballed the placement of the 4 snaps that I added to the 2T.
I did not add any snaps to the lace only hem section of the dress.
I used the awl to pierce the edges of the fabric where I attached the snaps.
Here are a few tips for adding your snaps....
You may want to pin your skirt while it is on a hanger so that the skirts line up neatly at the hem and so not get bunched up.
Place a thick piece of card board in between your dress front and back so that you do not pierce the front skirts of your dress!
Make sure that the snaps go through 2 layers of the underskirt fabric, since it is stronger than just the lace.

I opted to "hide" the snaps under the lace overlay.
I just took my serger tweezers to slip the snap piece under the top layer of the lace.
I think it helps to camouflage the snap better.

When attaching the snap with your pliers, be SURE the snap is in the well of your pliers!
The 2 layers and satin fabric are a bit slippery to deal with.

Aaahh...all 5 snaps neatly attached to the seam allowances!

See...that little snap is a little less noticeable since it is under the lace.
Now, finish up the pdf as written by Mother Goose Brownie Goose.
When you are finished...

"Aaaaahhhhh"
Cue angelic choir...
The "Snap Back Millie, Cross Shape Cut Out Easter dress" is FINISHED.
And yes, I was singing that in my head.

Oooh! Snappy dresser!

Love this crepe back satin and scalloped lace combo!

Sigh... that is the last bit of my mustard hand dyed organic cotton and
Bluebird Park Bunnies in Lampost Grey by Kate and Birdie Paper Company for Moda Fabrics.

So, what Millie do you fancy?

So sweet...

Thanks for stopping by, and as always,
Have a beautiful day!
No comments:
Post a Comment