Wednesday, June 26, 2013

Free Custom Cupcake Wrapper Templates

Custom Cupcake Tips &
Household Sized Cupcake Wrapper Template


Being a crafty mother can be so much fun! Especially when planning a Birthday Party....and a 1st Birthday Party is one of the best, I think. I still can't believe that baby girl just turned one. I can't bring myself to take down those last balloons...
 

Anyhoo~ let's obsess over the BEST part of any birthday party...CAKE! Mmmm. I love cake, but you know, my out of the box mix just does not compare to someone with that baking GIFT. I searched my local Facebook pages and luckily found Jen!

You can find her website here: http://kodiakcakegirl.com/ 


 She is THE Kodiak Cake Girl and man, are her cupcakes AWESOME! Seriously, I do not think that I have EVER tasted a better baked good...EVER. And let me tell ya, I have "sampled" quite a few jillion baked goods. Jen was super friendly, gave me exactly what I asked for visually, and delivered the fabulous chocolate cake and to DIE for Italian meringue buttercream frosting right on time! I never thought that I would eat a baked good so s-l-o-w-l-y as these creations. The super moist cake and the sweet, buttery light frosting were amazing. My older daughter said I need to order more asap. 

 
I was super excited to work with Jen. She asked for a picture or color sample so that she could get the coloring correct on the frosting too! What a doll! I sent her a picture of some bees that I had seen online, along with a link to my Classic Winnie the Pooh PDF papers. The coloring was perfect! Not to mention the scale and the modeling of the bees were cutie patootie and perfect to boot!
 
So, I will give you a check list here of what you need to remember to ask about/for when ordering your own custom cake!
1) Flavor of cake
2) Flavor of Icing
3) Type/size of cake (# of Cupcakes/ # of people to feed for sheet cake/ # of layers for a layered cake)
4) Pricing
5) Delivery/Pick up date
6) Style & color of party decorations (send a picture or a link to confirm the theme and colors)
7) Add ons... (fondant decorations, cupcake picks or toppers that can be added)
 
 
Since I was creating allllll of the decorations for the party, including the cupcake picks, I did not need those from my baker...I know, a bit obsessive, but it was suuuuper fun! I did not know how to make the fondant bees so I was sure to ask for those to "bee" included. Since I did not know exactly how I would assemble the decorative cupcake wrappers and picks, I asked my baker to box the bees separately. She even added toothpicks for safe transport and easy placement onto my flower frosted cupcakes. It was great!
 
 
When I got the divine baked creations home, I set aside one cupcake to "practice" assembling. I added the custom Classic Winnie the Pooh cupcake wrapper that I carefully printed and cut out(directions and one page print out at the end of this post). It is great because this wrapper fits the standard household sized cupcakes that you can make! I used the handy dandy double faced tape and a tweezers to wrap them and got 'em to stick. Then, I added the custom stamped Classic Winnie the Pooh picks I purchased/customized next. Finally, I carefully added the ADORABLE Classic Pooh inspired fondant bees onto the frosting rose. Voila! A perfectly cute, yummy first birthday cupcake for my little sweetie. And oh boy! Did she LOVE it! : )


DIY : Household Sized Cupcake Wrapper Template
1)             Download, print & cut out the template link below.
2)             Trace template shape onto the BACK of your pretty paper.
3)             Cut out as many custom themed cupcake wrapper as needed!
4)             Carefully apply double faced tape to one short, straight edge.
5)             Wrap the other end around the cupcake and adhere to tape.


Thanks so much to ....
 
 
for having me on to guest blog this post!

Stop by there to get your free
 
Custom Cupcake Wrapper Templates!
 
They fit any standard household cupcake or muffin tin.
 

Friday, June 21, 2013

Birthday Girl Dress PDF Pattern Review: Tilly by Brownie Goose

 
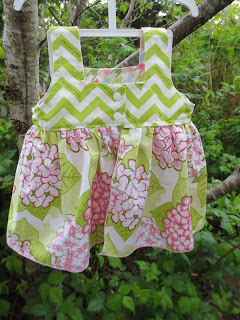
Since I am currently obsessing over sewing, I HAD to make the party dress for my special Birthday girl...right? I had been saving the one yard of flannel that grandma brought with her last year. I live on a remote island, so we only have a few boutique fabric stores. No Joanne, no Hobby Lobby, no Hancock, no Michael's....sigh. Well, the lack of endless shopping gives me more time to sew!
 
Anyhoo~ I scoured the Internet for patterns and just could not find anything that I liked loved...UNTIL I saw the Tilly pattern by Brownie Goose. It was love at first sight! The squared neckline, the graceful curved armholes and the best...that gorgeous open back! The dress is lined as well for cutie pies comfort.
 
I could see this style being a timeless classic. Plus, since I live in a colder climate, I had a few requirements. The dress needed to have the potential to be layered. The Tilly is great because you can have your sweetie wear it as a sleeveless summer top, or you can layer it beautifully! My daughter has worn it with a onsie, a lettuce edge t-shirt, and a turtleneck. Plus I have layered a vintage sweater over it as well!
 
I also needed to have something that I did not have to sew 10,000 buttonholes for. The Tilly is great because the button is just for looks. the bodice is sewn shut and it is nice and roomy to go over baby girl's head. Now, since I loooove the hard to find Classic Winnie the Pooh fabric, I decided to modify the pattern just a bit. I added snaps to the back. This will allow her to wear the dress a bit longer. Also, I can dress my dolly easier, since each time I try to put clothes on her it is like a WWF wrestling event between the two of us. Fortunately, I am victorious and she is clothed most of the time!
 
Another modification that I made was the length. Don't get me wrong, I love the classic version of the Tilly PDF, but again, I want her to be able to wear her Pooh dress as long as possible. The regular length that the pattern calls for is super. I think it gives the feminine look of a dress, but allows my toddler better mobility during playtime. After all, if you put an energetic kiddo in a long dress, much falling an fussing follow tripping over the skirt. Boo waaah!


OK back to the Tilly, have you tried the Brownie Goose PDF patterns yet? They are GREAT! The pattern is an instant download! So fast to get, print and start sewing! The tutorial is fab too! The pictures and directions are clear, easy to follow and includes a glossary of terms...just in case. The sizing I found to be spot on for my little girl too.
 
I just adore this pattern so much, there are no words to express how super it is. I think you can see what I mean...I finished my first "Tilly" just a few weeks ago and I have been on a non stop sewing spree of ONLY this pattern and variations of it! Take a look!
 
Denim, unlined, with serged edges.
 
 
Reversible! Rolled edge hems...


BEST upcycle ever...Daddy's uniform :)


If you MUST have this pattern , and trust me, you must! Go shop Brownie Goose Tilly now!
 
You can further obsess over Brownie Goose on Facebook and her blog too!


Sunday, June 9, 2013

Handcrafted Vintage Pooh First Birthday Bash

 
It is hard to believe that I was pregnant with my second daughter just a year ago.
I never realized the fast pace that life truly has until I became a mother.
But before, I tear up...let's talk PARTY! WoHoo!
 
 
I have recently been obsessing over the perfect one year old birthday party for my youngest "baby doll." The theme? Classic Pooh of course! Unfortunately, I only found a few different Winnie the Pooh themed decorations available....and one was a shower theme.
So, I was driven to Etsy. There was a few shops that offered custom Pooh decorations...but just not what I had in mind. So...whadda ya do when you just cant find that certain look?

 
You create it. Yup. I found bits and pieces of what I could use on Etsy, then I made all custom decorations for my dear daughter's bash. My older daughter reminded me that baby girl will not remember how the party was, and not to stress over it all.
But we all know how important these milestones can be for Mom baby...Right?

 
Stay tuned in the next few weeks and we will dissect the
 
CREATION of CUSTOM PARTY DECORATIONSsssss.
 
That was in an announcer echo type voice...not just yelling : )

 
The DIY tutorials to come...
 
~Custom Party Plates~
~Handcrafted Gift Wrap & Party Hats~
~Birthday Banner and High Chair/Buffet Banner~
~Household Sized Cupcake Wrappers & Custom Cupcake Tips~
~Birthday Girl Dress Pattern Review~
~Sewing an Heirloom Toy Gift~


That smile was sooooo worth it!

Friday, June 7, 2013

Phat Food Friday: DIY White Chocolate Covered Strawberries

What is better than a big, juicy, sweet strawberry? One dipped in white chocolate. Those clever clerks at the grocery just happened to put a coupon right next to the 2for strawberries. So I indulged in the $1.00 off of my Baker's Premium White Chocolate Baking Squares. Even better, the directions to melt that good stuff was right on the box! It's super easy...and ready to inhale in about 30 minutes!
Start out by choosing and hulling about 10 of your largest berries (that's fancy talk for cut off the leaves and the hardish part that the leaves are attached to). Give 'em a good rinse...

 ....and gently pat them dry.
Gather the rest of your supplies...
One 6 oz. box of Baker's Premium White Chocolate Baking Squares
About 10 largish strawberries
A glass dish to microwave the chocolate in.
A fork ( I used a vintage fondue fork).
A rubber spatula.
A cookie sheet covered in parchment or wax paper.
Optional...Pretzel sticks and a handful of Cherry flavored Dried Cranberries.


Ready? Great. You need to make SURE you have ALL of your supplies ready and nearby...the chocolate cools and hardens FAST. Once it has cooled you really can't melt it again because it gets grainy and tacky. So, you will be stuck chipping that hard chocolate out of your bowl.

Unwrap ALL of the White Chocolate Baking Squares & put them in the glass dish.
Microwave for 20-30 seconds.

Stir. Microwave an additional 10 seconds IF NEEDED.

Stir. When all of the large chunks are melted...

Start dipping! I stabbed that berry REALLY good...but not all the way thru the other side.
You do not want to drop it in that melted chocolate!
Place your dipped berry onto your cookie sheet covered in parchment.

When ALL of your berries have been dipped, you may have a bit of White Chocolate left.
My daughter reminded me that you can of course just use the rubber spatula to scoop all of the "extra" chocolate into your mouth.....
But we are going to drizzle it onto some pretzel sticks.
Trust me, the sweet and salty combo here is worth it!
Line up 4-5 pretzel sticks together....quickly now! That white chocolate is cooling fast!

Scrape the "extra" white chocolate into a small pool over the 4-5 pretzel sticks. When the chocolate cools, they will all be stuck together nicely for munching.
I also added a few Cherry flavored Dried Cranberries on top of the white chocolate...mmmm.

Let your picture taker/sous chef lick the actual "extra" chocolate.

Slide that cookie sheet into the fridge and let it all set for about 15 minutes.
Store your white chocolate treats in an airtight container for a day or two
....they don't usually last long at my house.

Serve up your ripe White Chocolate Covered Strawberries for a yummy treat!

And when your berries are gone...you can snack on these thing-a-ma-jigs!
A great sweet, tart and salty combo!

Tuesday, June 4, 2013

Retro Redo: Vintage Sweater Spruce-Up


I love a great vintage find. What is even better that going into your favorite vintage or thrift store? Finding a sentimental treasure right at home. When I was expecting my second daughter last year, I was pleasantly surprised to find this great baby sweater that was mine. My older daughter even wore it too! After a good 30some years of storage and use by three baby girls, it had seen some better days. A few of the tiny peralized buttons had been replaced, and I found myself stitching together a few loose yarns near the cuff. Well , it is time for this vintage piece to get some TLC. Grab an old sweater of your own and give it a new look in less than an hour!


The first thing that I needed to do was decide on the right trim. I truly love the vintage romantic feel in pieces, so that's the look I am after. You can get creative and use jumbo ric rac, a hand cut & gathered floral silk ruffle or any fancy trim that calls to you at your local sewing shop.
 
 
  I went for this package of Beige hem facing on the far right. It looks like a piece of flat lace...and the color is just right. This pack is from Wrights and measures 1-3/4" x 2-1/2 yards. I only needed about half a pack for this tiny trim.
 
  
Since I wanted to cover the buttons (rather than finding new buttons and hand sewing them alllll on) I needed to make sure that the trim was wide enough to hide the buttonholes, but not interfere with buttoning them. Find the trim that works best for your sweater and pin it in place to "test" out your look first.
 
Now, we are going to gather this into a ruffle today, so you need to cut the length to be two times longer than the length of the sweater.
 
 
Next, you ruffle the piece of lace.
 Folded over the very edge of the trim.
 
  Like this...
 Pin the folded edge down the entire length of the trim.
 With the longest stitch on your machine (mine is a 4...yours could be listed as "baste") sew/baste down the trim WITHOUT sewing over he beginning or end in reverse.
 Next, pull the bottom thread to gather the lace into a ruffle.
 
When you have a ruffle just a bit longer that the front of the sweater, you are done. You want the gathered lace to be about 1" too long on both the top and bottom edges so that later you can fold it over the edges of the sweater.
 
The far left side of the ruler shows where the line of stitches needs to be.
 
Start pinning the lace on the INSIDE bottom of the hem.
This will give you a more finished look.
 
Once you have pinned the edge of the lace ruffle to the inside bottom of the hem, flip your sweater right side out again. Lay the trim down flat.
 
 
Now pin the lace trim over the buttonholes...pinning just to the left of each hole.
Make sure to work carefully with your gathered lace.
if you pull on it the ruffle will slowly come undone.
 
 
 Once you are finished pinning the lace along the buttonholes,
you should have about 1" of lace left at the top.
 
 
 Like this....
 
 
 Again, flip over your sweater and fold over the last bit of ruffle.
 
 
Pin the lace on the INSIDE top of the hem.
This will give you a more finished look.
 
 
Now sew down the far left edge of the lace trim, making sure to anchor your hem at the beginning and end (sew in reverse for a few stitches). Also, be certain that you are sewing far enough away from the buttonholes...so you can still button them.
 
 
 See how nice the edges look from folding over that 1" at the top and bottom?
 
 
Here is what that should look like from the side... 
 
 
...and since you did such a nice job pinning your ruffle,
you can see that your buttons will still work! 
 
 
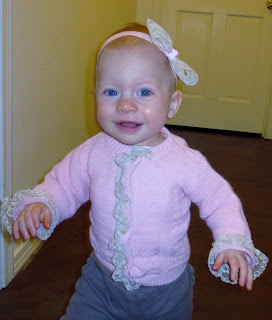
Here is what the finished front looks like...now on to the cuffs.
  
 
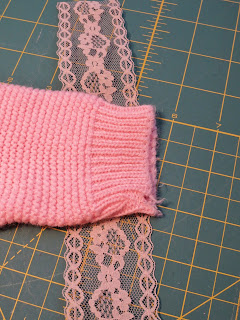
Again, cut the length of your lace trim TWO times longer than the cuff.
 
 
You can see how badly this little sweater needed some TLC.
 
 
I want the lace to be wider that it was over the buttons...so I am not folding the edge over when I baste my gathering stitch.
 
 
Now, gather the lace as you did before and pin to your cuff.
I wanted the lace to hang over the edge just a bit.
 
 When you get to the end of your trim, fold under the cut edge and pin.
 
Set your machine to a zig zag stitch. The zig zag stitch will allow the lace and the cuff to stretch out slightly when putting the sweater on....or in my case, WWF style wrestling my daughter into her clothes! You do not want to do all this work to have the stitches pop here, do you?
Sew the lace ruffle onto the cuff of the sweater. Repeat these steps for the other cuff.
 
 
Voila! You are finished!
 
 
Awww... I just love the thought of her dressing her own babies in this same sweater someday!
 
 
And because I could not resist...I whipped up a quick bow to match!
 
 
She is sooo proud  of herself...all dolled up!
 
 
I think its naptime!