Monday, October 28, 2013

DIY: Last Minute Halloween Trick or Treat Bucket Refashion

 
So, you are FINALLY finished with that fab costume and then...
you realize you need to update that treat bucket!
 
 
This is such a quick and easy bucket redo to set off your little sweeties costume.
Just be sure to do this the night before...so the Mod Podge can dry!
 
Grab a few things and lets get started!
 
You will need ...
Scrap Fabric to cover your pail
(or Paper...just fold instead of ironing)
Scissors
Pencil/Chalk
Mod Podge
Sponge Brush
Exacto knife
Hot Glue Gun & Glue Sticks
Iron & Ironing Board
Optional: Bias Tape Maker
 
 
Using the chalk, trace around the bottom of the bucket.
 
 
Cut the fabric out about 1/2" larger than the chalk circle you traced.
 Set fabric circle aside.
 
 
Measure the height of the bucket and add 1/2".
 
 
Measure the girth of the bucket and add 2".
 
 
On the long side, fold over one edge of the fabric 1/2" and press.
 
 
On one short end, fold over one edge of the fabric 1/2" and press.
Set the fabric aside for later.
 
 
Cut out a strip of fabric the girth of your bucket plus 2".
The strip should be 2" wide.
Using your bias tape maker, press the fabric.
If you do not have a Bias Tape Maker, simply fold over both edges 1/2" and press.


Fold the Bias Strip in 1/2 lengthwise and press a crease down the center.
Set the Bias Tape aside for later.
 
 
Using the Mod Podge and a sponge brush, apply the glue to the bottom of the bucket and down the sides about 1".
Do not worry about glue residue....Mod Podge dries clear!
 
 
Center your fabric circle, right side out, to the bottom of the bucket.
Apply more glue over the top of the fabric, smoothing out any fabric wrinkles as best you can.
 
 
Apply more glue to the outside of the fabric on the bottom of the bucket.
Let dry for an hour...rinse out your brush for later use!
 
 
Apply glue to the main outer surface of the bucket.
Line up your fabric neatly, starting with the short end that is NOT folded and pressed.
 
 
Glue all the fabric on the bucket, ending with the pressed edge.
Be sure to line it up neatly and smooth out the wrinkles as best you can while the glue is still wet.
 
 
Cover the top of the fabric with more glue, smoothing out wrinkles as you go.
 
 
Be sure to glue ALL edges well.
Let dry for an hour...rinse out your brush for later use!
 
 
Heat up your glue gun.
 
 
Start to glue one edge of the bias tape you made to the top edge of your bucket.
Use a clothes pin or clip to anchor the end.
 
 
Run a line of glue along the edge of your bucket a few inches at a time.
Cover the glue with your fabric strip evenly.
 
 
When you come to the handle roves, use your exacto knife to trim away the fabric from the handle slot.
 
 
Check for fit.
Continue to apply the bias tape around the entire outside edge.


Fold the bias tape over the top edge of the bucket.
Repeat the above hot glue instructions to attach the bias tape to the inside edge of the bucket.


FINISHED!
Add a cute row of lace or pompon fringe if desired!
Have a happy Halloween!

Thursday, October 24, 2013

Phat Food Friday: Mushroom Swiss Chicken Bake!

 
Mmmmm. You know that ONE recipe that just makes your mouth water? That special dish you can never have too often? Well, this is IT for me. Savory, cheesy, wholesome and filling....delish. To top it off, it is super easy. Just when you cannot think it can get any better, I will tell you it can. This is the #1 dish I make for company too! It is so easy to prep, economical and allows you to entertain (aka not be stuck in the kitchen) when you have company. Make sure you print off extra copies of this too because all of your guests will NEED a copy after you have blown their socks off with this meal!
Are you ready? I am! Lets get started....


Get out your 8"x8" glass dish and gather your ingredients....
 
1. 1/4 cup of dry white wine
*Note: ~ I use Pinot Grigio ~ You can substitute any WHITE wine that is not sweet. The bite here in the wine is what gives the dish its distinct flavor. You may substitute 1/4 cup White Cooking Wine, or 1/4 cup water. DO NOT USE RED WINE...your dish will turn purple : (
2. 1 can condensed cream of mushroom soup (10 and 3/4 oz. )
*You may substitute Cream of Celery or Cream of Chicken if needed.
3. 6-7 slices of Swiss Cheese Slices
4. 2 T. butter, melted
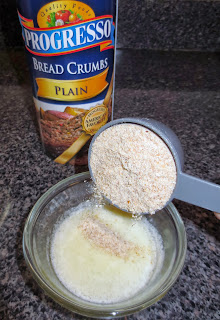
5. 1/4 cup of bread crumbs
6. One pound of boneless skinless chicken breasts (I prefer to cook with fresh never frozen meat, as the taste and texture is superior. In a pinch you can use frozen chicken breasts, but your cook time will double)
 
~This is excellent served over a bed of Long Grain Wild Rice with your favorite green vegetable or a salad and paired with a dry white wine!~
 
 Preheat your oven to 375and grease your 8"x8" glass dish.


Whisk together the soup and wine.
 
 
Pour this over your chicken.
 
 
Cover the chicken completely with your soup and wine sauce.
 
 
Cover the dish completely with the Swiss cheese slices.
 
 
Melt your butter.
Mix in the 1/4 cup of breadcrumbs with a fork.
The consistency here should be crumbly, and sound like sand when it is just right.
Add a 1/2 Tablespoon at a time until you reach this consistency.
 
 
Sprinkle your bread crumb & butter crumble over the dish.
 
 
Put into your preheated 375oven for 30-45 minutes.
Your cook time will vary on the size and thickness of your chicken pieces.
Check the internal temperature of the thickest part of the meat for a temperature of 165⁰.
If you used frozen, unthawed chicken your cook time will be an hour minimum.
 
~Go sit down with your glass of wine.~
 
 
When your dish is golden and bubbly around the edges, you are ready to serve!
 
 
Serve this savory comfort food ASAP!
The sauce is great over bed of Long Grain Wild Rice.
Be careful when plating...do not smother the buttery crunchy breadcrumbs in cheesy sauce...
My #1 request it "Lots of breadcrumbs please."


  I hope you enjoy...Cheers!

Tuesday, October 22, 2013

DIY: Comfy Shorts into Pants!

The Sewing Geek


Every body loves a good pair of comfy shorts...right?
Its just too bad when the weather forces us to bundle up.
I have just the remedy for the chilly weather....
take your favorite shorts pattern and turn them into...comfy pants!
 
 
My good friend Meghan, The Sewing Geek, designed the BEST shorts pattern ever!
They are called the Comfy Shorts, and let me tell you, they are!
The fit is spot on! These shorts are roomy in all the right places.
The pattern is super easy to print and assemble.
Meghan walks you through the directions with fantastic photos and easy to follow directions!
 
 
I just HAD to use the BEST pattern for my little girl's Comfy Fleece Pants for winter.
Here is how YOU can do it!
 
 
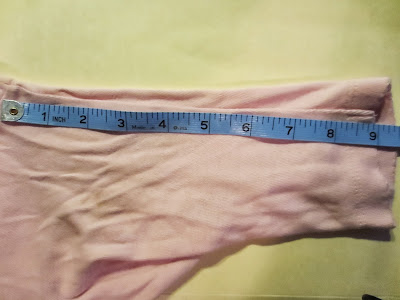
First, you need to measure your child for his/her inseam. I used a pair of pants that fit well. Measure from the crotch seam down the leg to the bottom pants hem. My inseam measurement was 9". We will call this "X" below.
 
 
Next, get your Comfy Shorts pattern.
If you do not already own it, hop on over to The Sewing Geek shop now!
 Read through Meghan's fab tutorial.
When you are ready to cut (Steps 1-3) follow my directions below instead...
 
 
Fold your fabric in half and line up the pattern pieces as shown above.
 
 
Measure the inseam for your shorts size. This is "Y"
Take your pants inseam "X" from above and subtract Comfy Shorts inseam "Y". The resulting number we will call "A."
X-Y=A
For example, I had 9" inseam. Comfy Shorts inseam in the size I was making was about 5"...
9"- 5"= 4"
 
 
Measure down from the edge of the shorts pattern and add on measurement "A"...4" in my case.


Mark in chalk your new pant leg extensions...shown in yellow.
 
 
Cut out along your pattern pieces USING THE NEW LONGER PANT LINES that you added.
You can see this cut line as the purple dashed lines shown above.
 
 
Your newly cut Comfy PANTS should look like this!
Return to the awesome Sewing Geek pattern, step 4 and finish the pants using all of the same steps.
 
 
Oooh! So soft and cozy!
 
 
Baby girl loves to wear them to bed...and outside to play!


The Sewing Geek also has a great blog!
She shows you how to add CARGO pockets to your comfy shorts too!
 
We have a little Q & A here with Meghan, THE Sewing Geek!
Thanks so much for stopping by!
 
Q: How did you get your start sewing...and what did you do before creating PDF Patterns?
 
A: I went to school for geology and worked as a Geochemist for 4 years. I quit working to stay at home with the kids and picked sewing back up. I learned as a child and sewed off and on up until college. I didn't like following patterns though. I liked the technical aspects of making my own. I liked the math and making the patterns and figuring out n my own how to put it all together.
 
Q: What motivated you to open your shop?
 
A: I sewed blankets and sold them on Etsy for a while but I got bored with sewing the same things over and over.
 
That's when I decided to give pattern making a try. I figured out how to draft patterns on my computer and it was pretty easy for me to put together a tutorial that people could easily follow. I think all of that technical writing while I was first starting as a geochemist helped!
 
Q: What was your first PDF pattern release?
 
The Sewing Geek 
 
A: The first pattern I released was actually just a tutorial...it was the minky blanket tutorial! The first clothing pattern I released was the Moo skirt. By the time I made the Moo skirt I was absolutely in love with pattern making. My first patterns were simple and with each new pattern I make I add something new I have never done to challenge myself.
 
 
Q: Where does your inspiration for new patterns come from?
 
The Sewing Geek
 
A: I get my inspiration from everywhere. I seam stalk. LOL! My husband makes fun of me because I'll inch closer to people in public- like when we are standing in line- and I try to figure out how their clothes are put together!
 
My kids help too. For example with the Olive dress, I sewed up a muslin to try on my middle daughter. I put it on her and she immediately said, "Where are the pockets mom?" That's how I came about adding in the inseam pockets.
 
 I keep a notebook full of my ideas too. My problem is that I have a hard time finding the time to put all of my designs into practice. The three kids (5,4, and almost 2) keep me busy.
 
 
Thanks so much for sharing with us today Meghan! I'll be stopping by your blog again soon for more sewing Tips & Tricks : ) I think my favorite part about The Sewing Geek are the fab tutorials! I am an intermediate sewist and I ALWAYS learn something new from her patterns! If you have not already checked out the blog and shop...please do!


Bye... Thanks for stopping by!