It's almost time!


My daughter has always insisted that I dress up with her on Halloween...and how can I resist?
It is so much fun.

Our whole family loves to attend the Renn Faire too...so, its easy to reuse the same clothing for different looks. Sometimes though, you just need a little something extra to spruce up that old get up, eh?!

Today I want to share with you a fun little DIY: Reversible Pirate & the Princess Pouch!
You can add it to your costume for that final touch.
My daughter has used them for her costumes as a: Princess, Pirate, Gypsy, Witches/Sorcerers' spell bag, even an Elven Archer!
See mom?! You NEEEEEEED one!
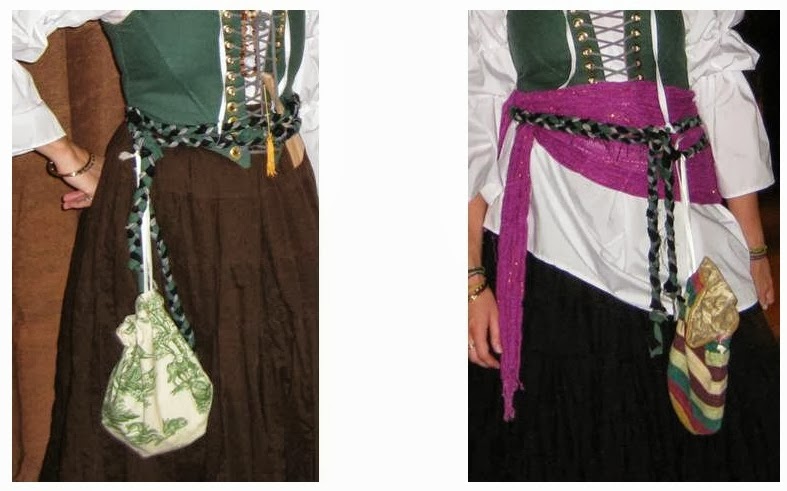
Moms and dads should not feel left out! I carry mine when we go to the faire...dads can use them with their Jedi garb too! Then, when the force is keeping you apart, you can still call each other! Hahaha. The possibilities are endless. My favorite part is the fact that the pouch is reversible. Use a fun print on one side and a neutral solid for the inside to get the most use out of it!

So, lets spice up your little one's Pirate or Princess
costume this month with without breaking the bank!
This lovely REVERSIBLE pouch will add that finishing
touch to your little one's ensemble! Not sure what fabric to use? Choose your
favorite 2 prints or solids and get two new looks in one simple project. Your
Princess can dangle this lovely new purse from her wrist, or in between her
fingers. Your precious Pirate can stash away his treasures from this pouch that
hangs from his belt. You could even super size this for mom or dad! Store all
of your necessities (cell phone/keys/wallet/etc) while strolling the streets for candy or
a day at the faire.
Gather your standard sewing supplies and choose your fabric.
I will give the measurements for the kid size pouch during the
tut. (The measurements for the Super Size Pouch for adults is at the end of
this tut...all directions are the same.)
You need two fat eights in different prints/colors.......or scraps to
cut out the following pieces.
Here is what you need to cut out ...
·
one piece of 16" x 6" for the "outside" panels
·
one pieces of 16" x 6" for the "inside" panels
·
one piece of ribbon 22" for the drawstring/handle 1/2" -
3/4" works best.
The finished pouch will be ~ 7" tall and 5" wide with a
drawstring handle of ~10" long when folded over and tied.

Arrrg! Let's get stARRRRted!

Place your 2 pieces Right Sides Together (RST).

Sew the 2 short ends together using a 1/2" seam allowance.

Open up your loop of fabric and press the seams to one side.
If you want finished edges for the drawstring casing,
Serge the raw edges on both sides, trimming away just a bit of fabric.
I did not do that in these photos, but have with other pouches. You could also use a pinking shears or an overcast stitch if desired.

With the fabric loop folded as shown above, press a crease in each one of the bottom edges.

From the center seam that you stitched to join the 2 fabrics together (middle blue arrow.), measure down 1.5" (2" for the Super size pouch) and mark with a pin these points are marked in the photo above with blue arrows.
Using a 5/8" seam allowance sew from your pin to the bottom folded edge of each side, along the dashed red lines in the photo above.
Remove your marker pins.

Fold the edges back 5/8" as shown and press open the seams you just stitched together.

Fold the pouch in 1/2 lengthwise.
Do this by matching the two bottom corners of the pouch that are the same color.
Mark 1.5" in and 1.5" up from the corner. This should give you a 45 degree angle.
Connect the two points and mark with chalk.

Trim the corners off by cutting along the chalk line.

Unfold your pouch and it should look like the photo above.

Fold your pouch down, along the first center seam you stitched so that the edges are all even and the folds at the bottom of each pouch are as shown above.
Pin all layers together as show above.

Using the edge that you trimmed off on a 45 degree angle, sew a 5/8" seam allowance (from the trimmed edge) to join all layers together as shown above along the dashed red line.
BE SURE TO SEW TO THE VERY EDGES, BACK STITCHING WELL.
This not only joins all layers for easy reversing, but it closes the bottom of the bags so tiny items do not fall through a hole.
Trim off the corners of the other pouch at a 45 degree angle to reduce the bulk as shown above along the blue arrows.
Remove your pins!

Open the side slits that were not sewn together earlier and pull the right side of your fabric out through one of the holes.

Your pouch is now right side out!
Carefully, roll the top seam so that the edges are nice and straight along the top. Ideally, you will not see the other fabric peeking out too much from the reverse side.

Using the 5/8" crease that you neatly pressed earlier along the seam allowance, tuck the raw edges in.
Press. Be sure that the seams are nice and neat here so that you do not see the other fabric on the reverse. Check inside and out!

Pin the edges. When you begin and end your stitching in the next step, you want these edges to stay nice and neatly lined up.
If you have a bit of bunching, it is not a big deal...
the pouch will be cinched shut most of the time.
Note the position of the pins above. These pins also mark the OPENING for the ribbon casing. You need these to stay even, but do not sew that area shut.

Remembering to back stitch at the beginning and the end of each edge, sew near the very edge of the pouch (far right lines of white stitching in photo above). This stitch secures the top edge where the 2 different fabric patterns/colors meet.
Next, sew just above the stitching that is the side seam of the pouch (far left lines of white stitching above). You can see that point pictured above. It is just between the butterfly tag and the far left lines of white stitching.

Press if desired.

Loosely tie a pin to one end of your ribbon. Thread the ribbon through both sides of the casing. Tie a knot in the end of your ribbon and you are all set!

You are ready to hit the streets with your fab new Reversible Pirate or the Princess Pouch!

You can even amp this up a bit...use satin on one side and a velvety fine whale corduroy on the other!
Add satin cording and a fine tassel for your drawstring M'a Lady!

You could even add a band of trim to the very top edge!

Super Size Adult Pirate & the Princess Pouch
Use these measurements for the larger pouch...all directions above are
the same.
You need two fat eights in different prints/colors.......or scraps to
cut out the following pieces.
Here is what you need to cut out ...
·
one piece of of 21" x 9" for the "outside" panels
·
one piece of 21" x 9" for the "inside" panels
·
one piece of ribbon 35" for the drawstring/handle 1/2" -
3/4" works best.
The finished pouch will be ~ 10" tall and 8" wide with a
drawstring handle of ~17" long when folded over and tied.

Thanks for being a "Sweetie" and stopping by!
~ Happy Halloween! ~
No comments:
Post a Comment